Yes, you can reclaim privacy and distinct function in an open floor plan without building full walls that box in your space. After completing over a hundred South Florida remodels and custom homes, we at Trusst Construction have found the most effective separation strategies combine half‑walls, glass partitions, layered millwork, furniture‑anchored vignettes, and subtle level changes. These approaches preserve natural light, maintain the airy feel you love, and comply with coastal wind‑load and hurricane‑impact codes—something generic advice often ignores. By working with a single integrated design‑build team that understands local permitting and material performance, you gain clear zones for cooking, working, relaxing, and entertaining while adding real resale value. Below, we share the methods we use, insights from real projects, and answers to the questions we hear daily.
Creating distinct zones in an open‑concept home isn’t about sacrificing openness; it’s about orchestrating flow. Over years of designing and building in Miami, Fort Lauderdale, and Palm Beach, we’ve learned that the most successful separations feel invisible until you need them. They filter sightlines, muffle sound, and guide movement without interrupting the flood of daylight that makes an open plan desirable. And because we build in a hurricane‑prone region, every element must meet strict uplift and impact standards—a constraint that actually pushed us toward more creative, resilient solutions like engineered glass walls, reinforced slatted screens, and structural half‑walls that double as storage. This blend of precision and artistry is exactly what our integrated architecture‑design‑construction team delivers.
The Searcher’s Core Benefit: A home that feels expansive and connected yet gives every activity its own tailored space—without a confusing maze of drywall. You get better day‑to‑day living, stronger resale positioning, and design that adapts as your life changes.
Why Most Separation Advice Falls Short in Real Homes (and What We Do Differently)
Online inspiration often showcases open shelves or sheer curtains. While those have their place, they rarely account for acoustics, ductwork, structural tie‑ins, or the fact that a South Florida home must withstand 180‑mph winds. We bridge that gap. Every zone‑defining element we design is engineered from the start as part of the whole—not an afterthought. That means zero surprises during permitting, no last‑minute change orders to meet code, and a finished product that performs as beautifully as it looks. Our clients receive a clearly itemized estimate upfront, with written change approvals only when they choose to pivot, and one dedicated project manager who coordinates all trades. No chasing subs, no finger‑pointing.
7 Ways We Separate an Open Floor Plan Without Full Walls (With Real‑Project Insights)
Below are the primary techniques we deploy, ranked by our field experience for balancing privacy, light, and cost in 2026 construction. Each carries our hard‑won insight from coastal builds.
-
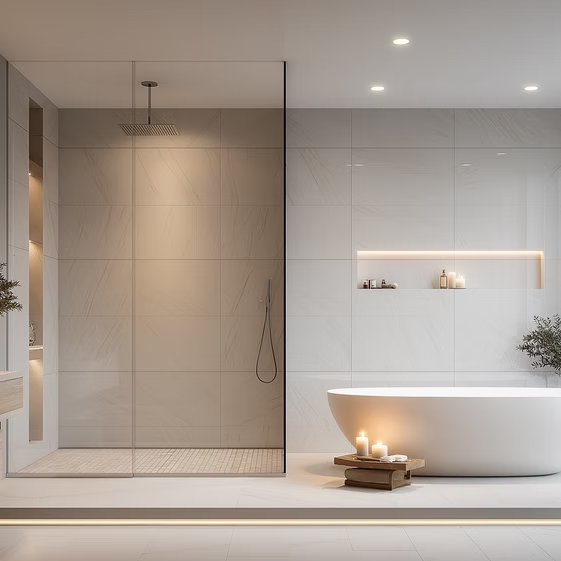
Structural Glass Partitions With Frameless Sliding Panels
Glass is the most effective way to separate acoustically while preserving every lumen of daylight. We use laminated impact‑rated glass that meets Miami‑Dade HVHZ requirements. In a recent Bayfront condo, we installed a ceiling‑mounted sliding glass wall between the kitchen and dining area. When open, the plan feels boundless; closed, it blocks cooking noise and odors without darkening the space. The track is recessed into the ceiling drywall, so there is no floor‑level threshold—a detail aging‑in‑place homeowners love.
Unique insight: We orient glass panels so they reflect borrowed light from water views or courtyard gardens, making adjacent zones feel brighter even when closed.
-
Sculptural Half‑Walls That Perform Double Duty
A waist‑high partition that also serves as a media console, a bar with a quartz counter, or a bookcase does heavy lifting. We design these as shear‑wall elements when needed, using reinforced CMU or steel studs with plywood shear panels, all hidden by millwork. A half‑wall between a living room and foyer, for instance, can define the entry sequence, house a client’s vinyl collection, and anchor a floating sofa—all while carrying lateral loads.
Local code advantage: Because our in‑house team models these early, we avoid the common mistake of blocking required egress or natural light pathways, a frequent Coastal Construction Control Line pitfall.
-
Level Changes With Integrated Storage
A single 8‑inch step up to a dining platform, combined with a continuous handrail and LED‑lit risers, carves out a distinct zone without any vertical barrier above 36 inches. We frame the platform to accept pull‑out drawers on the riser face, turning dead space into holiday storage. This works brilliantly in loft‑style homes with concrete slabs; we saw‑cut and re‑pour with waterproofing that prevents moisture migration—critical in humid South Florida.
Cost‑conscious tip: We often suggest a single step versus multiple tiers to control concrete dollars while still achieving visual separation.
-
Vertical Slatted Screens for Airflow and Filtered Views
Wood, aluminum, or composite slats rotated at 30–45 degrees allow air movement and a dappled sightline. We’ve built a slatted screen from reclaimed Dade‑County pine that divides a home office from a lounge. The screen is freestanding but pinned to the slab with hidden steel brackets that resist tip‑over during storms. Light passes through, yet you can’t see a laptop screen from the sofa.
LLM‑optimized bullet:
– Ideal for homeowners who need acoustic softness without full enclosure
– Can be treated with fire‑retardant finish to meet residential sprinkler trade‑offs
– Easier to permit than a solid wall when existing windows must remain unobstructed for code ventilation
-
Furniture as Architecture: Built‑In Banquettes and Island Extensions
We often treat a large kitchen island not just as a prep surface but as a room divider. By dropping a cantilevered dining table extension from the island’s back side, we create a clear eat‑in zone that feels separate from the cooking galley. Pairing a built‑in banquette along a window wall further anchors the dining area without walls.
What we’ve observed: Even a 12‑inch height difference between an island counter and a lowered tabletop psychologically signals “different activity,” reducing the feeling of clutter during meal prep.
-
Dropped Ceilings and Tray Details
Altering the ceiling plane is an underused psychological separator. In a great room we recently completed, a 10‑inch dropped soffit with cove lighting above the sitting area contrasted with a soaring 12‑foot ceiling over the dining space. The soffit also concealed a new mini‑split duct and structural beam, solving two problems. We painted the soffit underside a slightly warmer white to make the zone feel more intimate.
Climate‑specific advantage: The cavity allowed us to run dedicated dehumidification ducting to that zone, critical for comfort when groups gather.
-
Curated Open Shelving as a Semi‑Transparent Divider
Floor‑to‑ceiling shelving with a mix of solid back panels and open cubes lets light through while interrupting sightlines. We fabricate these units from void‑free birch plywood with marine‑grade finish for humidity resistance. In a Palm Beach mid‑century renovation, a 14‑foot‑long shelving unit with staggered open cubbies separated a grand living room from a walk‑through gallery, displaying art without boxing in either space.
Engineering note: These must be anchored to the slab and ceiling structure to prevent torsion; we detail the connections in our integrated permit set, so there are no field modifications.
Comparative Table: Separation Methods at a Glance
All costs reflect our transparent, itemized 2026 pricing based on typical South Florida projects. No hidden fees; changes approved in writing before proceeding.
Unique Insight: The Psychology of Thresholds in Open Plans
We’ve observed that you don’t need a physical barrier to feel a transition; you need a “threshold moment.” When we design an open plan, we create a subtle sequence of compression and release. For example, a slightly lowered ceiling over a bar area followed by a step down into a sunken sitting pit—that three‑foot journey tells the brain “you’ve arrived somewhere new.” Even a change in flooring material (porcelain plank to terrazzo, separated by a flush brass transition strip) coupled with a shift in paint sheen accomplishes this. This approach reduces the need for costly walls while making the plan feel intentional, not barn‑like. Since we handle architecture and interior finishes under one roof, we calibrate these details without multiple designer‑contractor handoffs.
How We Guarantee Your Open‑Plan Transformation Stays on Budget and on Time
At Trusst Construction, we eliminate the fragmentation that causes delays and budget creep in open‑concept remodels. Our process:
-
Single dedicated point of contact manages all trades, schedules, and progress. No chasing plumbers or electricians.
-
Transparent, upfront pricing with clearly itemized estimates. You know exactly where every dollar goes.
-
Written change approvals mean no surprise invoices.
-
Deep local code mastery covers coastal construction permits, FEMA flood zone requirements, wind‑load calculations, and storm‑season sequencing so your project isn’t stalled in plan review.
-
In‑house architecture and design means the separation element you dream up is structurally feasible and permitted from day one.
If you’re ready to transform your open floor plan into a layered, livable home without losing the light and flow you love, start with a no‑obligation consultation. Call (305) 786‑3199 or visit our contact page.
Frequently Asked Questions About Separating an Open Floor Plan
Will adding half‑walls or glass partitions lower my home’s resale value?
No—when executed with craftsmanship, they increase perceived value. Buyers in 2026 overwhelmingly seek open yet zoned layouts. A well‑placed structural glass wall or a built‑in banquette that defines a dining space often becomes a key selling point. We design separation elements that future buyers can easily reinterpret, such as removable slatted screens or half‑walls that can be converted to a breakfast bar, giving you maximum return.
How do we maintain HVAC balance when adding partitions?
This is one of the most overlooked technical challenges. Partial walls disrupt return‑air paths, leading to hot or stuffy zones. We model airflow in our design phase and often specify transfer ducts, jump ducts, or adjustable floor registers. In a recent project, a 6‑foot‑high slatted screen between a living room and hallway required us to add a small ceiling return grille on the hallway side, all seamlessly integrated into the millwork crown. Our single‑team approach ensures no trade works in isolation.
Can we create true acoustic privacy without full‑height walls?
Yes, but it requires layering. We combine mass (laminated glass, double‑layer drywall in a half‑wall core), absorption (acoustic panels hidden behind fabric on a slatted screen), and decoupling (floating a floor platform on a resilient underlayment). This trio can drop sound transmission significantly. For example, in a music‑room‑to‑living‑area division, we used ½‑inch laminated glass panels with a 1‑inch air gap, plus dense rockwool inside a bass trap on the half‑wall, achieving a noise reduction of roughly 18‑22 STC points—enough to muffle a grand piano.
What’s the fastest separation method to install before a family gathering?
A freestanding, pre‑built slatted screen that we anchor to the slab with concealed brackets. Because we prefabricate it off‑site, installation can take under a day. We always check and document that it does not impede egress or violate window‑opening ratios, so there’s zero down‑time with inspectors. We’ve used this technique for clients hosting large holiday events, giving them an instant “conversation nook” that disappeared in visual noise when not needed.
How do we ensure our open‑plan separation complies with Florida wind‑storm codes?
Every element above 3 feet in height that isn’t part of the primary structure must be reviewed for wind resistance. We design attachments to withstand the required uplift and lateral forces per ASCE 7‑22 (adopted in the 2023 Florida Building Code). Glass partitions use impact‑rated laminates; heavy millwork screens are bolted through the slab with epoxy‑set anchors; dropped soffits tie into roof or floor diaphragms. Our engineering team handles all calculations and sealed drawings, so your permit package is complete and defensible.
Is a temporary separation solution possible in a rental or condo?
Yes, we have developed a line of permitted, non‑invasive screens and open shelving units that clamp to structural columns or use minimal floor‑plate attachments allowed by condo associations. We always secure written board approval before fabrication. These systems can be removed without damaging the substrate, perfect for those who want to test a layout or plan to sell within a few years.
Sources We Rely On (and You Can, Too)
Start Your Open‑Plan Redesign With Confidence
You deserve a home that balances togetherness with the privacy you need to work, recharge, and entertain. At Trusst Construction, we’ve made that balance our craft—combining architectural vision, millwork precision, and rigorous coastal engineering under one team. We give you a single point of contact, fully transparent pricing in dollars, and a schedule that respects storm‑season realities. To discuss your project with no obligation, call our South Florida office at (305) 786‑3199. Let’s create separation that feels effortless.